A T-Shirt Swap

I was so excited when Sally suggested doing a t-shirt swap with our little ones over Twitter. We actually became twitter friends before being blog friends, which I feel is so rare. She is a wonderful mother and if I could have a touch of her creativity I would be in pure bliss. I can not wait for the day when we get to meet in person, but for now building community from afar is quite wonderful. We did a simple freezer paper stencil. Sally put together a wonderful tutorial. The kiddos had a blast making them and KJ and I came up with the design. He is in superhero mode lately.


Can you believe I spaced taking an after picture. Oh well, I plan to make more of them for KJ's upcoming birthday party so I will be sure to get a photo then. You can see the gorgeous shirts Sally, J, and j made for Ellie and KJ. They LOVE them. Oh, and Sally's packaging put mine to shame. She really can do it all. Can you tell I am feeling quite inspired?

A Tree


Today I am over on Mrs. French where I am sharing our advent calendar for this Christmas season. I can easily see it becoming a Christmas tradition. 

Also I would like to say a huge thank you for all your kind words on yesterday's post. I really wish every one of you could come over for a cup of tea and some cookies.

Painting + Rugs


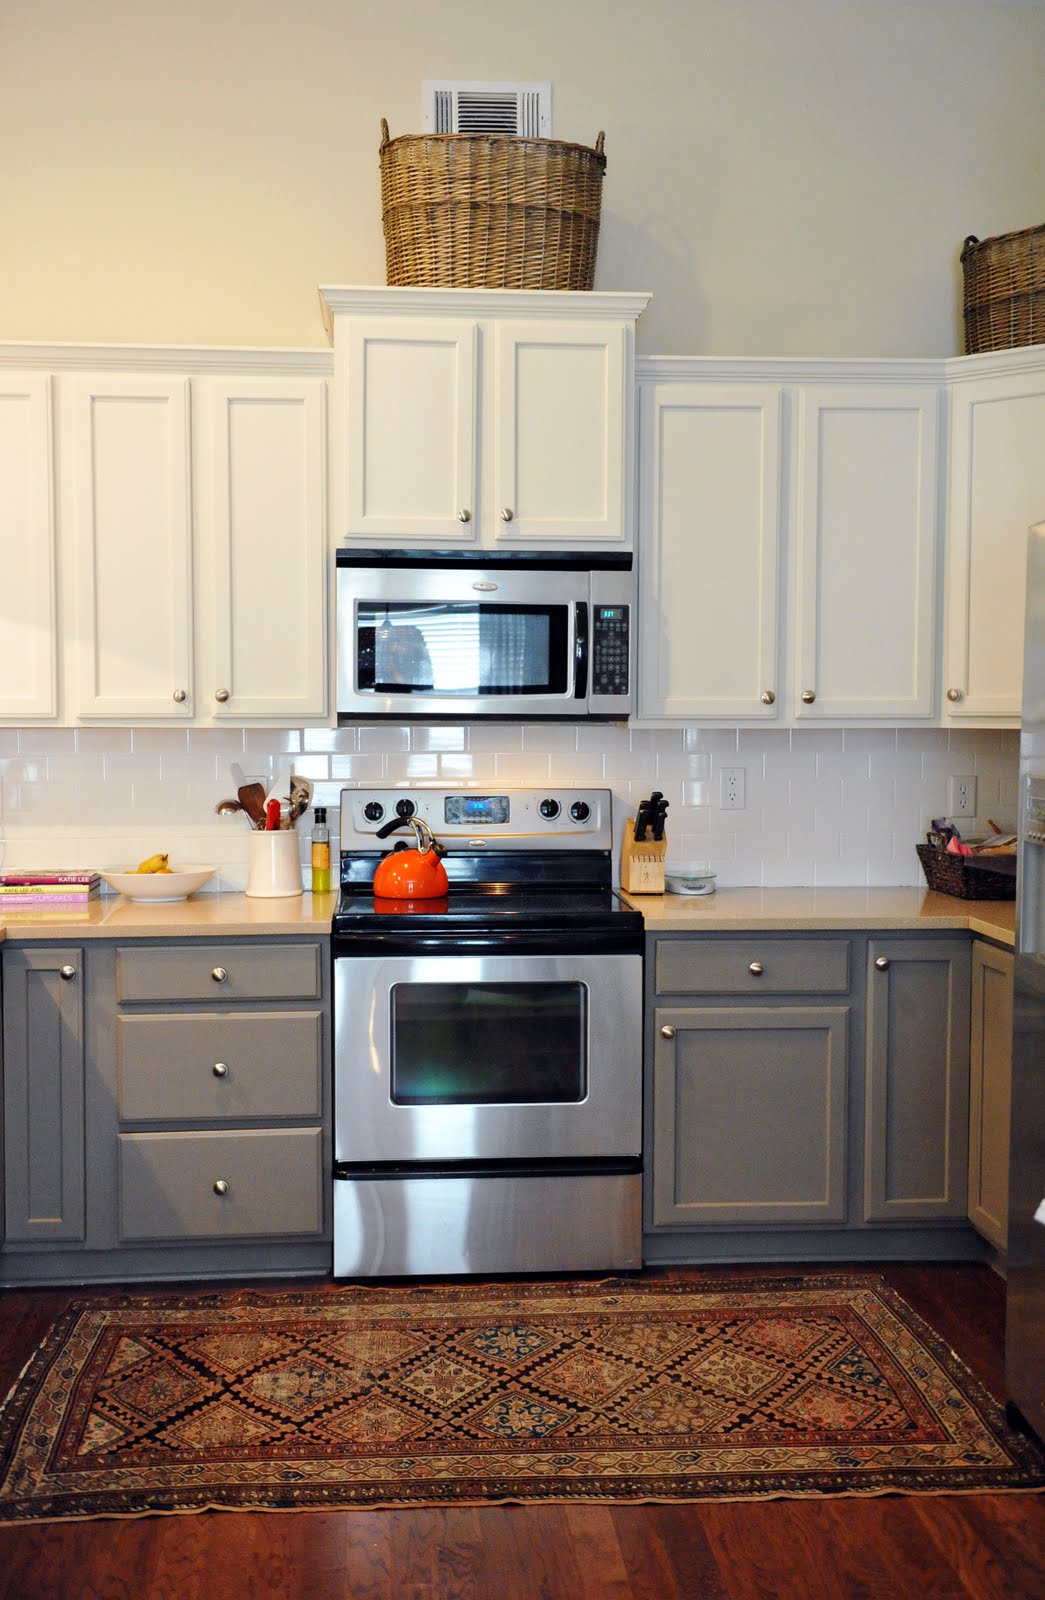
I have had quite a few requests on giving more details about my kitchen makeover. I personally hate giving advice on this subject, because I am not a painting professional and simply did what I wanted. Case in point I used a latex satin paint without any sort of lacquer after. I did not want any sheen so this is what I chose. So far it has held up well and has taken quite a beating from the kiddos and has cleaned up fine. In reality I know an oil base is best as is a semi or high gloss or a lacquer coating. For those of you who could not care less about the how dos you can just take a glimpse at my new antique rug find from ebay. I adore it. Okay now back to it...

-I used a latex primer after a really good cleaning and sanding. Then between each coat I did a light sanding. It took a total of one full evening and one full day from start to finish. It took one primer coat and two to three paint coats. For the framing of the cabinets my husband painted it all by hand with a regular and foam brush. For the doors and drawers I used a paint sprayer in the garage. It has become my new best friend.

-All paint was Sherwin Williams. The bottom is Warm Stone. The top was a Benjamin Moore color that I had matched by Sherwin William's, unfortunately I cannot remember the name for the life of me. In the image it looks a lot more white next to my wall color than it really is. It's more on the cream side. The formula is...

Bac Colorant 02 32 64 128
B1 Black - 2 - -
N1 Rawumber - 11 1 -
Y3 Deep Gold - 9 1 -

-My knobs are the same ones that came with the house. I really wanted these in antique brass, but were a bit too cost prohibiting for the amount we needed.

-My counter tops are Silestone in Minerva Cream. The benefits are huge and were what we wanted at the time which was something easy. They are truly easy and good looking.

Hope this answered a few of your questions. Let me know if I missed anything and I will answer them in the comment section. Have a great Day!

* This lovely lady from High-Heeled Foot in the Door did a great play by play of painting her mother's cabinets. Now that I look back it seems we went with similar colors, ha! Great minds think alike?

STUNNING


BEFORE...


AFTER...


After seeing Rachel's bathroom redo on Design Sponge I must say I became quite enthralled with many of her home projects she features on Southern Exposure. She has a background in interior design but is a stay at home mom currently. I suppose that explains her amazing eye for detail. This before and after stopped me in my tracks. The glossy black is stunning, but adding the green and white stripes takes it to a whole new level. Completely stunning. See more of this gorgeous transformation here. Oh, how I would love to recreate this look.

Layering Mirrors


Jenny from Little Green Notebook posted this image with the idea of layering mirrors. I was smitten. We currently have the one huge mirror that is in most mass builders homes and I have always been too scared to rip it down. I just adore this option, but I was was not willing to spend very much either. Well, I was in Target the other day and came across two frame less mirrors on clearance for $19.00 a piece. The size and shape are perfect...


Anyone have any brilliant ideas on how to hang them safely now? I would love your thoughts. The mirrors are fairly heavy.

Keeping It Green DIY

Although fall is my favorite season it does make me sad to see my garden fade. Most of the front garden is evergreen, but the porch which normally houses a few pots of flowers was looking bare. This time around I wanted something that would last and that was easy to manage. I really just did not want to have to think about it too much, so instead of flowers I used reindeer moss that had been dyed a bright green. I bought it from a local garden shop and could not be more pleased with the outcome.


Creating this look was super easy. I simply hot glued the moss to a half round circle that I picked up at JoAnn Fabrics. The circle fit perfectly into the mouth of my pot and stays there quite nicely. Ugly on the bottom...


Fabulous on the top...


A little color in the garden could not make me any happier.

DIY Headboard

So I am redoing my bedroom, again. I am only going to show a snippet today because it still has quite a ways to go, but the bed is quite a large snippet I believe. I finally convinced my husband to let me make my own headboard. He was afraid it would look cheap, but he still gave me the go ahead.


The Supplies:
2 bags of extra loft batting
staple gun
just over 2 yards of fabric
plywood (thick enough so it would not bend)
2x4 cut into 2 ft legs
drill
screws

(I could have also used thick foam, but that would have added to the cost and I wasn't wanting anything to thick anyway.)

The plywood I had cut at our local supply store into a 76x46 piece. We have a king size bed and with this size it makes the headboard tall and have the ability to go down to our box springs. That way from a side view you wouldn't be able to see the legs.


I then took the batting and laid it out on the board and wrapped it around the back and stapled well. I used two bags of queen size batting to give the headboard some softness.


I repeated the above process with the fabric which was a remnant I found at a local fabric shop. It was only $8 a yard, yeah! The key to this step is to make sure you keep the fabric smooth. Pull taunt and then pull again, but be aware of creating ripples.


The final piece before adding legs. As you can see there are some wrinkles in my fabric. I tried ironing the opposite side, but being velvet it started to change the color so I am now just hoping they will work themselves out over time.


Next I attached the 2 foot legs to the back of the board with screws. These legs are 16" from the ground to the headboard. This gave clearance for outlets that are behind the bed.


My husband then helped me put the headboard behind the bed. We pushed our bed firmly up against the headboard and for us it seems firm enough. We could attach it to the wall at a later date if we feel a wobble, but so far so good.


Simple, quick, and budget friendly. I could not be more happy with the outcome.

Mini Blind Love

Jenny from Little Green Notebook is one of my favorite daily reads. Her creativity and design style always has me swooning. Well, yesterday she posted a pic that got my wheels turning...


The grosgrain slatted blinds would be perfect for our home. We currently have white blinds on all the large window across the back of our house. I think adding this touch would make them extra special. Curtains are always an option, but with little hands that happen to also eat in the same areas it's just not practical. We never raise the blinds so I am thinking this would make a great DIY project.

I am thinking a greek key trim would add a nice touch. Anybody ever do anything like this? I would love to know how it worked out.

Oh, and yes this is the day I am suppose to update you all on my spending hiatus, well I am thinking I will take this month off. I will share later, I am sure.